Hello hungry peoples,
Yes, yes, I know I have spelt the title wrong but frankly it represents the level of French that I speak. A french co-worker nearly chocked herself laughing at what she called my “atrocious Aussie accent”. I have been to France a couple of times and was able to survive by throwing random amounts of money at people and pointing a lot. Best tourist ever!

There are many things I love about the French – the architecture, the history, their awesome accents but their love of food and wine makes me their best friend. They know how to make a mean pastry and really contrived much of what we call fine dining cuisine. So my hat is off to you sexy peoples.
We have a weekly tradition in my house. It could be called “giving me my weekly pastry fix” but we settled on Croissant Saturday. It is my favourite day. There have been many times I have slobbed to the supermarket to get the freshly baked stuff (usually in my pj’s). I must have looked hobbo-esk as I was accused by one of my neighbours of stealing my own mail one morning.
I decided that to prevent my possible arrest I should learn how to make my own croissants. Let’s be honest, no matter how bad you stuff them up the fact that they are fresh and piping hot will make them taste better than any of the stale stuff you can get at the supermarket. There are lots of websites devoted to making the perfect croissant. I am not going to do that. This is the good enough croissant that you can start on Saturday morning and enjoy on Sunday morning. Its not pretty but it gets the job done and reduces some of the prep required to make a technically perfect croissant. It is also a huge step up from the usual croissant cheat of rolling up and baking some pre-bought puff pastry. Don’t do this….it is evil……well maybe not evil but puff pastry has too many layers and will be too puffed up. Its not really the same.
So what are the key things: butter…. so much buttery goodness. In terms of ingredients croissants are super simple but getting the technique right is a pain. The trick with croissants is you want the butter incorporated into the pastry so that you have many beautiful delicious layers (but not too many!) and you don’t want the butter to vanish into the dough (e.g. get too hot). This usually involves rolling the dough, folding it and then leaving it for hours in the fridge to chill again. Timing is also a bummer because you want to eat the croissant’s now dammit! I usually make a large batch and freeze them. Given croissants can cost from $3-$5 and this makes 12 you could argue the effort is worth it even if they were not so god damn delicious.
Ingredients
- 500g plain flour (bread flour if you have it but I never do)
- 10g yeast
- 10g salt
- 40g caster sugar
- 300ml milk/water combination
- 1 block (250g) butter
Cooking Directions
Day 1 – Morning
- Put 500g flour, 10g yeast, 40g sugar and 300ml milk/water together in a mixing bowl then mix using a kneading hook on your mixer (or your hands if you are old school). I like the Lowan dried yeast as it comes in a large container and keeps well in the fridge. Those little satchets of yeast annoy me as I tend to run out of them. The sugar is to feed the yeast so while it seems like a lot you need it. Don’t skimp on this. One of the original recipes I tried had double this amount of sugar, which made the croissants far too sweet so you need to strike a balance. Caster sugar is the best to use as it is finer and incorporates into the dough better. In regards to the water, some people use milk instead, or a combination of the two. There is a belief that milk really gets the yeast going and makes the croissants fluffier. I have done both and haven’t noticed a significant difference.
- Sprinkle the dough with the 10g salt and keep mixing with the kneading hook until you have a pretty firm dough. Don’t ever add yeast and salt together directly as salt is the worst enemy of yeast. Maybe not worst – second worst? Either way they die.
- Chill the dough in a plastic bag or some wrap (you don’t want the dough to dry out) in the freezer for 20 minutes. You can chill the dough for an hour in the fridge but this recipe is mostly about getting through these steps quicker than you normally would. I used to always skip the chilling step for any dough because who can be bothered but it is actually pretty important. I always had a heck of a time rolling anything out because the chilling sets the dough together and actually makes your life a whole lot easier. This is your dough, this is your dough on drugs (i.e. not sufficiently refrigerated). So no to drugs and improper refrigeration Sigh!….you get the point.
- Once the dough is chilled, roll it out to roughly 1 cm thickness, trying to maintain a square shape (this makes life easier later with shaping the dough).
- Grate a block of cold butter. Other more kosher methods have you whacking the butter until it is thin and then layering it on the dough. Grating is a much easier way to distribute the butter.
- Cover the dough with the grated butter, forming a thin layer.
- Roll the dough so that the butter is within the roll. This is another cheat. Instead of laboriously rolling the dough multiple times and chilling in between, you work quickly with the dough cold and you create a multitude of layers with minimum fuss.
- Quickly roll the pastry out again, fold it over itself like an envelope and then chill for about 8 hours in the fridge. It needs this time to rest and rise or your croissants will be a bit sad and flat.

Day 1 – Evening
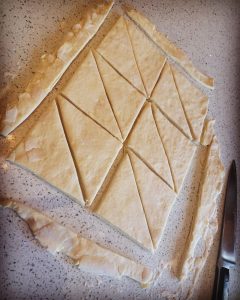
- Before I go to bed I roll the dough out to 1 cm thickness in a roughly rectangular shape. I then subdivided the rectangle into two strips. I then cut the strips into 3 squares each. Finally these are then halved into triangles.
- Each triangle is rolled up into the familiar crescent shape. It sometimes helps to tug the bottom of the triangles while you do this. A lot of people swear by this step. Something to do with the gluten and texture. I have also discovered if you cut a small slit in the base the croissants are much easier to roll.
- Try to roll the croissant dough pretty tightly. I have to admit I suck at this bit. My croissants never look pretty and perfect but they sure taste better and isn’t that the important thing?
- You then leave the croissants to rise (also called prove) overnight. Some people do this in a low temperature oven to make it warmer but we live in Australia people. We don’t need the help. Traditionally you do this on the morning of your bake but I am not willing to wait for my dough to rise AND bake. As long as it is not too hot overnight, which will destroy your butter layers, they will be fine.

Day 2 – Morning
- Preheat the oven to 180 degrees C.
- Give the croissants a quick egg wash with a little salt.
- Space the croissants out on a baking sheet (preferably with a lip as sometimes butter will escape, ideally this doesn’t happen but you know…life etc.).
- Spacing the croissants out seems to be important. You need good air flow to cook them evenly. Bake them for 15-20 mins. Doughy croissants = sad face, burnt croissants = tragic face. They will be different from store bought croissants, generally denser and less fluffy but a denser croissant is its own kind of special-ness.

That’s it. Enjoy!
p.s. The first time I did this hubby and I ate the entire batch in one go. This is a terrible idea. Don’t do this!
p.p.s. The croissants freeze and reheat perfectly well and will last a couple of weeks. You should probably do this.
p.p.p.s The best option is to freeze after proving but before baking. Just place them in a tray in a freezer until frozen and then put them in some freezer bags for storage. You can put these frozen croissants straight into the oven. They will just take a bit longer to cook.